
Simple DIY Nail Art Guide: Create Elegant Nail Designs at Home
Simple DIY Nail Art Guide: Create Elegant Nail Designs at Home
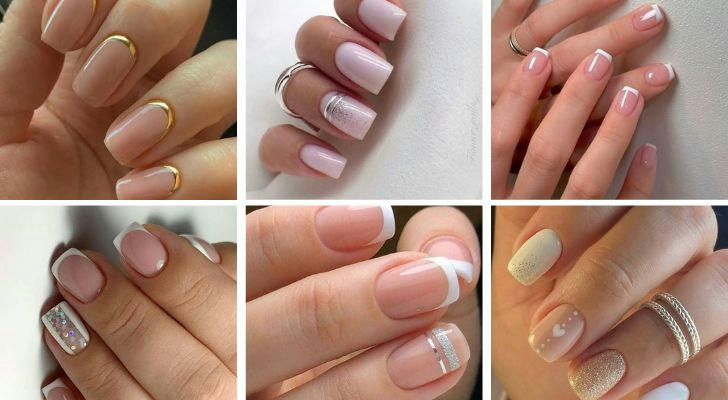
Nail Art Design:
Nail art not only enhances your overall look but also expresses your personal style. If you want to save time and money from visiting a nail salon, why not try DIY nail art at home? This guide will introduce you to simple and easy-to-follow DIY nail art techniques so you can create elegant and stylish nail designs effortlessly.
Essential Tools
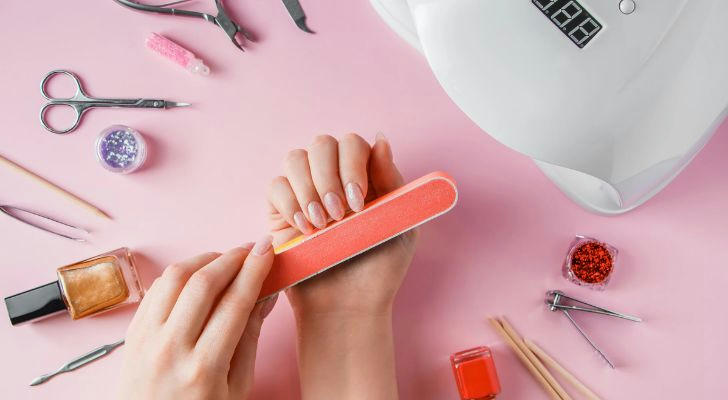
Before starting your DIY nail art, make sure you have the following tools:
Nail file (to shape and smooth your nails)
Cuticle pusher (to remove dead skin around the nails)
Base coat (to protect your nails)
Nail polish (choose your favorite colors)
Dotting tool or toothpick (for creating patterns and designs)
Top coat (to increase durability and shine)
Cotton swabs and nail polish remover (to clean up excess polish)
Step-by-Step DIY Nail Art Process
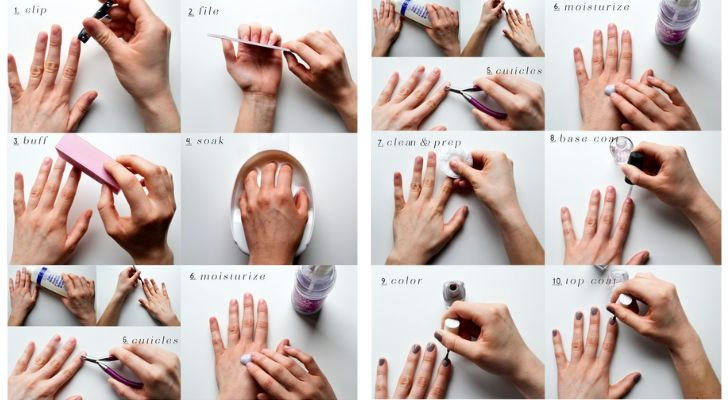
1. Shape and Prepare Your Nails
Use a nail file to trim and shape your nails according to your preference.
Push back the cuticles gently using a cuticle pusher to create a clean nail base.
2. Apply Base Coat
A base coat protects your nails and prevents staining from nail polish.
Wait for 2-3 minutes to let the base coat dry completely.
3. Apply Nail Polish
Choose your desired color and apply a thin, even layer of nail polish.
Let the first layer dry before applying a second coat for a more vibrant look.
Use a smooth, steady motion while applying polish to avoid streaks.
4. Creative Nail Art Designs (Optional)


French Manicure: Apply a sheer pink or nude polish as the base. Once dry, use white nail polish to paint a thin curve at the tip of each nail. For precision, use a nail strip or tape as a guide.
Ombre Nails: Apply a base color (e.g., light pink). Use a makeup sponge to dab a darker shade on the tip of your nails, blending into the base color. Repeat for a seamless gradient effect.
Polka Dot Nails: Paint your nails with a solid base color (e.g., blue). Dip a dotting tool or toothpick into a contrasting polish (e.g., white) and create evenly spaced dots for a fun and playful look.
Striped Nails: Apply a base color and let it dry. Place thin strips of nail tape on your nails, then paint over with a contrasting color. Remove the tape carefully before the polish dries to reveal crisp stripes.
Floral Nail Art: Use a dotting tool to create five small dots in a circle with white polish, forming flower petals. Add a yellow dot in the center for a cute floral effect.
5. Apply a Top Coat
A top coat helps to seal in the design, enhance the shine, and prolong the longevity of your nail art.
Apply a thin layer and let it dry completely to prevent smudging.
6. Clean Up the Edges
- Use a cotton swab dipped in nail polish remover to clean up any excess polish around your nails.
DIY Nail Art Tips and Tricks
Before applying nail polish, wipe your nails with alcohol to remove oils, ensuring the polish adheres better and lasts longer.
Apply nail polish in three strokes—one down the center and one on each side—to create a smooth and even finish.
If you want your polish to dry faster, soak your nails in ice water for about 30 seconds after application.
Give your nails a break between applications to maintain their health and prevent damage from prolonged use of polish.
Store your nail polish in a cool, dark place to prevent thickening and maintain its quality over time.
If you make a mistake, don’t worry—use a small brush dipped in remover to fix minor errors without starting over.
Benefits of DIY Nail Art
DIY nail art has several advantages beyond just saving money. It allows you to experiment with different styles, designs, and colors, giving you the freedom to express your personality. You can also do it at your convenience, without the need for salon appointments. Additionally, doing your nails at home ensures better hygiene and reduces the risk of infections that can sometimes occur in salons. Plus, it’s a relaxing and creative hobby that can be both fun and rewarding.
Final Thoughts
DIY nail art is an enjoyable and accessible way to create stunning nail designs from the comfort of your home. With the right tools and a little practice, you can achieve salon-quality results without spending a fortune. Whether you prefer classic, minimalistic styles or bold, intricate designs, DIY nail art allows you to personalize your nails according to your mood and occasion. So, grab your favorite nail polishes and start experimenting—your nails deserve to shine!